Most of the time, we, the programmers, want to create the Setup File for our projects. This blog contains the basic steps of creating setup files in .NET. The easy steps are as follows (in MS Visual Studio 2005)-
- Create a Setup Project. [File > New > Project]
- Add your Project to Setup Project.
- Open Solution Explorer window
- Right click on Solution Icon
- Add Exsiting Project (Here JSAPIObfuscatorProg)
- Create Exe File
- Select Location of Installed Components
- Go to Properties of Application Folder
- Change Default Location (if you wish)
- Make Always Create = true
- Add Shortcut to Program Files
- Go to properties of User’s Programs Menu
- Make Always Create = true
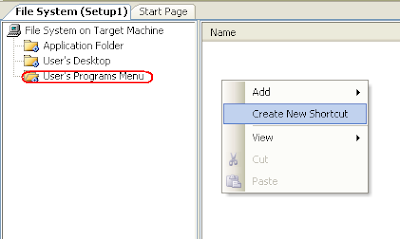
- Click on User’s Program Menu
- Right Click on the blank white space
- Select Create New Shortcut
- Choose the target item [Application Folder > Primary Output From…]
- Add Shortcut to User’s Desktop
- Similar to Program File shortcut
- Change Icon of Exe file
- Change Name & Icon of Shortcuts
- Prerequisites: Sometimes you might need to install .NET framework, Crystal Report etc. before installing your product. In this case, you need to add Pre-requisites. If prerequisites will be installed only if they are not installed in user computer.
- Go to Project -> Properties.
- Click on Prerequisites button
- Select the prerequisites from the list
- Choose Download prerequisites from same location as my application option
- Build the project. You will get the setup files insides Debug folder.


1 Comment:
good tutorial
will come handy, can you add some advanced features like how to add some entry into the registry with setup project etc
Post a Comment